
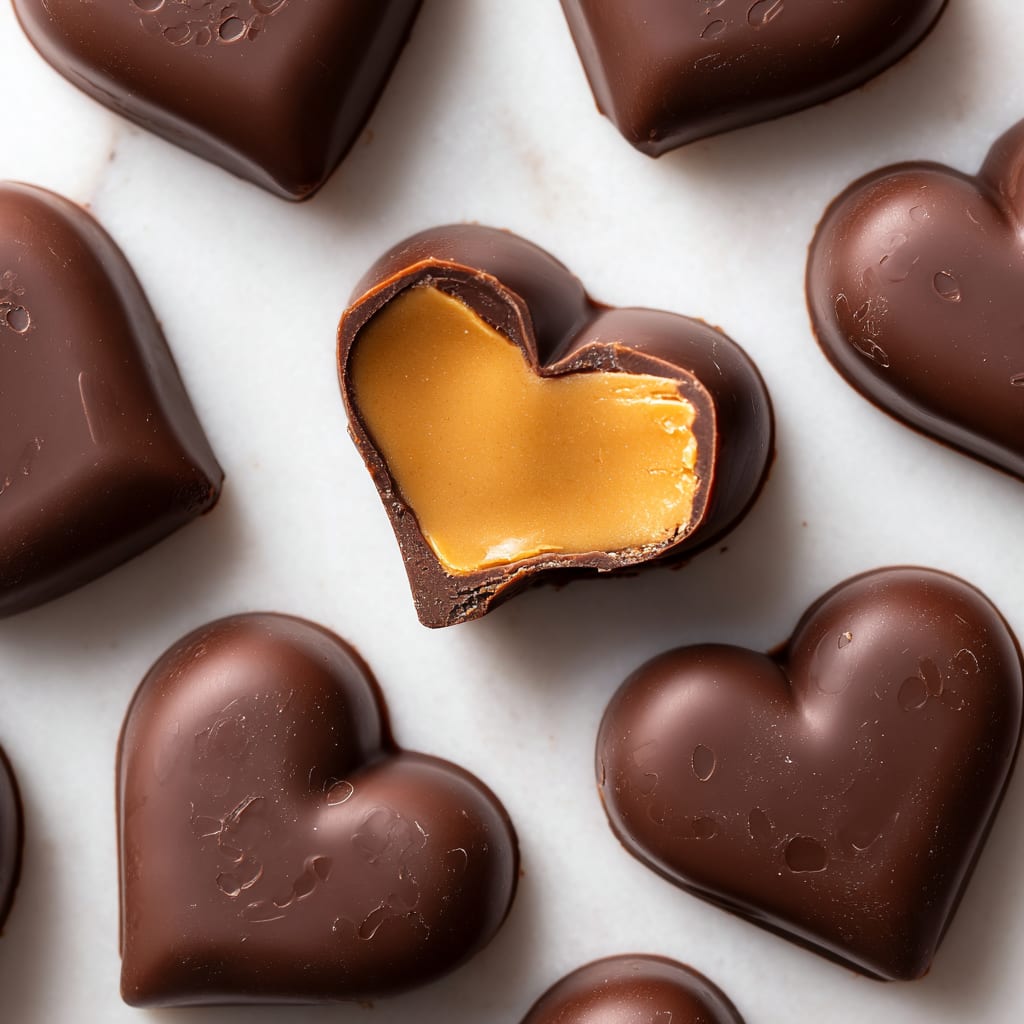
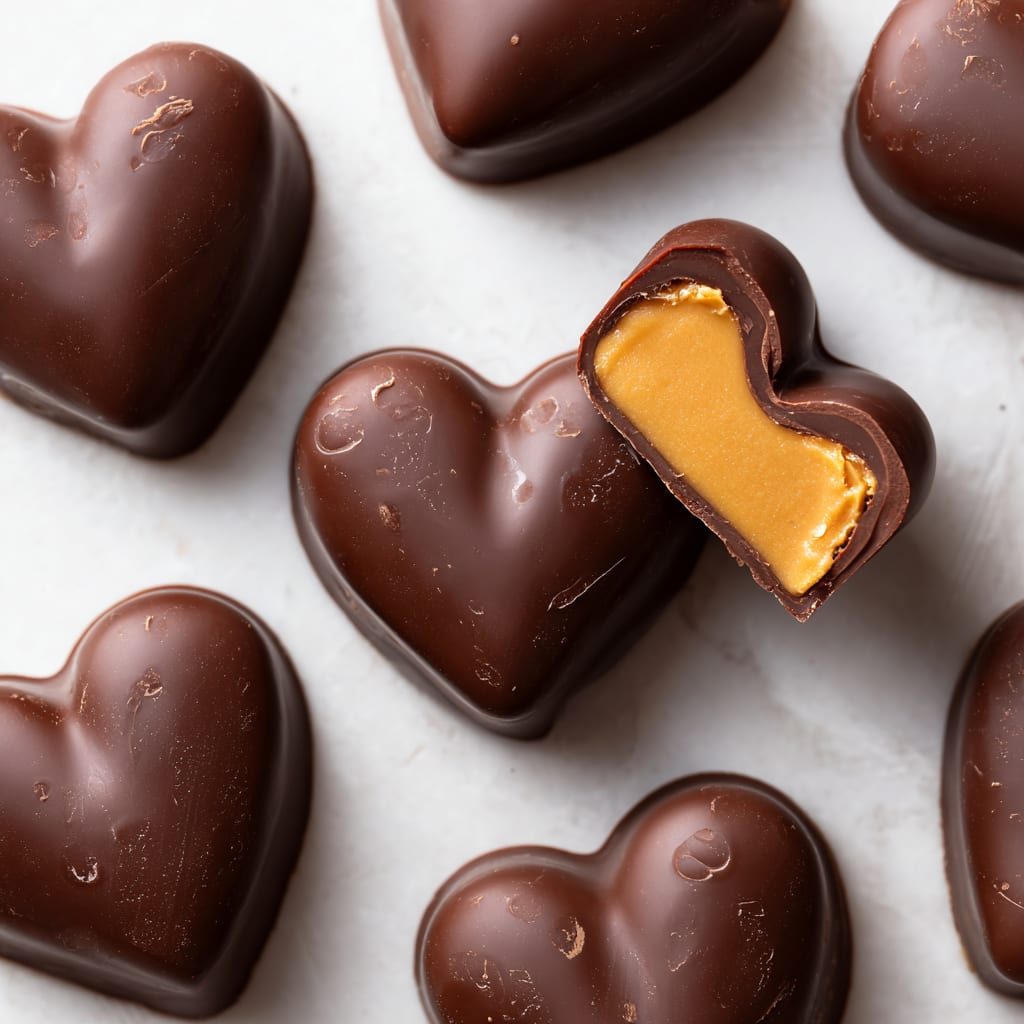
Imagine biting into a velvety, decadent treat that combines the irresistible duo of rich chocolate and creamy peanut butter, all shaped into a romantic symbol of love. The Chocolate Peanut Butter Valentines Heart is the perfect homemade gift that speaks volumes without saying a word. This delightful confection strikes the perfect balance between sweet chocolate and nutty peanut butter, creating a melt-in-your-mouth experience that’s impossible to forget. Whether you’re celebrating with your significant other or showing yourself some love this Valentine’s Day, this recipe is guaranteed to impress. You’ll learn how to create a stunning dessert that looks professional but requires surprisingly little effort.
Why You’ll Love This Recipe
The Chocolate Peanut Butter Valentines Heart isn’t just another dessert—it’s an experience that engages all your senses. The satisfying snap of the chocolate shell gives way to the silky-smooth peanut butter filling, creating a textural contrast that makes each bite exciting. What makes this recipe truly special is its versatility; it’s elegant enough for a romantic evening yet simple enough for a heartfelt homemade gift.
Time is precious, especially when preparing for Valentine’s Day, which is why this recipe is designed to be straightforward yet impressive. You don’t need professional baking skills or specialized equipment to achieve stunning results. The visual impact of these chocolate hearts is guaranteed to elicit gasps of delight before anyone even takes their first bite.
Perhaps the most compelling reason to make these valentine chocolate peanut butter hearts is the customization factor. You can easily adjust the sweetness, choose different chocolate varieties, or add personal touches that make the gift uniquely meaningful to your recipient.
Ingredients
For the Chocolate Peanut Butter Valentines Heart, you’ll need quality ingredients that work harmoniously to create a sublime taste experience:
For the chocolate shell:
- 10 oz (280g) high-quality dark chocolate (60-70% cocoa), chopped
- 2 tbsp (30g) unsalted butter
- 1 tsp vanilla extract
For the peanut butter filling:
- 1 cup (250g) smooth peanut butter (natural or regular)
- 3/4 cup (90g) powdered sugar, sifted
- 4 tbsp (56g) unsalted butter, softened
- 1/4 tsp salt (omit if using salted peanut butter)
For decoration:
- 3 oz (85g) white chocolate or pink candy melts
- Sprinkles, edible glitter, or crushed freeze-dried raspberries (optional)
The quality of chocolate is paramount in this recipe—opt for premium chocolate with at least 60% cocoa content for the best flavor profile in your peanut butter valentine hearts. Similarly, choose a peanut butter that suits your preference; natural varieties offer a more pronounced nutty flavor, while conventional brands provide a smoother consistency.
Pro Tips
Tempering Your Chocolate Properly
The secret to achieving that professional-looking glossy finish and perfect snap on your Chocolate Peanut Butter Valentines Heart lies in proper tempering. Use a thermometer to monitor temperatures precisely—heat your dark chocolate to 115°F (46°C), cool to 82°F (28°C), then carefully rewarm to 88-90°F (31-32°C). This process aligns the cocoa butter crystals, preventing the white bloom that can appear on improperly tempered chocolate. If you’re short on time, adding 1 tablespoon of coconut oil per cup of chocolate creates a similar effect with less fuss.
Creating the Perfect Filling Consistency
The ideal peanut butter filling should be firm enough to hold its shape yet creamy enough to melt in your mouth. Achieve this balance by beating the mixture until it lightens in color and increases slightly in volume. If your filling is too soft, chill it for 15 minutes before assembling. If it’s too firm, add a teaspoon of cream or milk to soften it. This attention to detail ensures your heart-shaped peanut butter chocolates have that professional textural contrast.
Flawless Heart Molding
When working with heart-shaped molds, apply chocolate with a small food-safe paintbrush to reach all crevices, preventing air bubbles and ensuring a complete shell. Tap the mold gently on the counter several times to release any trapped air. For a truly professional finish, scrape the excess chocolate from the top of the mold with a bench scraper held at a 45-degree angle before the chocolate sets.
Instructions
Step 1: Prepare the Chocolate Shell
Begin by thoroughly cleaning your heart-shaped chocolate molds, ensuring they’re completely dry—any moisture will cause the chocolate to seize. Place the chopped dark chocolate and butter in a heatproof bowl. Create a double boiler by positioning the bowl over a pot of barely simmering water, making sure the bowl doesn’t touch the water. Stir gently until 75% melted, then remove from heat and continue stirring until completely smooth. Stir in the vanilla extract. If tempering properly, follow the temperature guidelines from the pro tips section. Let the chocolate cool slightly until it begins to thicken but remains pourable.
Step 2: Create the First Chocolate Layer
Using a small spoon or food-safe paintbrush, coat the inside of each heart cavity with a layer of chocolate. Pay special attention to the sides, ensuring they’re completely covered. Gently tap the mold on the counter to remove air bubbles and create an even coating. Place the mold in the refrigerator for 5-7 minutes until the chocolate is set but not completely hardened. Apply a second layer of chocolate to ensure a sturdy shell that won’t crack when filled. Return to the refrigerator for another 10 minutes until completely set.
Step 3: Prepare the Peanut Butter Filling
While the chocolate shells chill, make your filling. In a medium bowl, combine the peanut butter, softened butter, powdered sugar, and salt. Beat with an electric mixer on medium speed for 2-3 minutes until the mixture becomes lighter in color and fluffy. The texture should be smooth enough to pipe but firm enough to hold its shape. Transfer the peanut butter mixture to a piping bag fitted with a medium round tip or use a zip-top bag with the corner snipped off.
Step 4: Fill and Seal the Hearts
Remove the chocolate shells from the refrigerator. Pipe the peanut butter filling into each cavity, leaving about 1/8-inch space from the top. Smooth the surface with a small offset spatula or the back of a spoon. Reheat the remaining chocolate until fluid but not hot. Carefully spoon or pipe chocolate over the filling to seal each heart. Use an offset spatula to scrape away excess chocolate, creating a smooth base. Return to the refrigerator for 20-30 minutes to set completely.
Step 5: Unmold and Decorate
Once fully set, carefully unmold your Chocolate Peanut Butter Valentines Hearts by turning the mold over and gently tapping or flexing it. For decoration, melt white chocolate or pink candy melts in the microwave in 15-second intervals, stirring between each. Drizzle decoratively over the hearts using a fork or piping bag. While still wet, add sprinkles or edible decorations if desired. Allow decorations to set fully before packaging or serving your beautiful chocolate peanut butter hearts.
Variations
White Chocolate Peanut Butter Hearts
Create an elegant twist on the classic Chocolate Peanut Butter Valentines Heart by substituting white chocolate for the dark chocolate shell. The creamy sweetness of white chocolate pairs beautifully with the savory notes of peanut butter, creating a more delicate flavor profile. To enhance the valentine theme, add a few drops of red or pink food coloring to the white chocolate for a rosy hue that’s perfect for the occasion. This variation creates a stunning visual contrast when the hearts are cut or bitten into, revealing the darker peanut butter center.
Crunchy Chocolate Hearts
For those who appreciate textural complexity, incorporate crispy elements into your valentine peanut butter hearts. Mix 1/4 cup of crushed rice cereal, chopped peanuts, or toffee bits into the peanut butter filling before piping it into the shells. Alternatively, sprinkle these crunchy additions between the filling and the top chocolate layer. The added dimension of texture creates an exciting eating experience that contrasts wonderfully with the smooth chocolate exterior.
Healthier Valentine Hearts
Create a more nutritious version by using dark chocolate with 85% cocoa content, which contains less sugar and more antioxidants. Replace regular peanut butter with an all-natural variety without added oils or sugars, and substitute the powdered sugar with 3-4 tablespoons of honey or maple syrup, adjusting to taste. This variation maintains the decadence while offering a slightly more wholesome treat for your valentine.
Storage and Serving
Your Chocolate Peanut Butter Valentines Hearts will maintain peak freshness for up to 2 weeks when stored properly. Place them in an airtight container with parchment paper between layers to prevent sticking. Store at room temperature (65-70°F) in a cool, dry place away from direct sunlight or heat sources. If your home is warm, refrigeration is preferable, but allow them to come to room temperature for 15-20 minutes before serving to experience the optimal texture and flavor profile.
For an elevated dessert experience, serve these chocolate peanut butter hearts alongside a glass of port wine or bourbon, which beautifully complements the chocolate-peanut butter combination. For a family-friendly pairing, a cold glass of milk or hot coffee provides the perfect counterpoint to the rich sweetness.
Create a romantic dessert plate by placing a Chocolate Peanut Butter Valentines Heart atop a pool of raspberry coulis, with a few fresh berries and a sprig of mint for garnish. For an impressive gift presentation, wrap individual hearts in gold or red foil, then arrange them in a decorative box lined with tissue paper for a professional-looking homemade gift that truly speaks from the heart.
FAQs
Can I use milk chocolate instead of dark chocolate?
Absolutely! Milk chocolate creates a sweeter Chocolate Peanut Butter Valentines Heart with less bitter notes. However, you may want to reduce the powdered sugar in the filling by 1-2 tablespoons to maintain balance. Be aware that milk chocolate is more temperamental when melting, so work at slightly lower temperatures than you would with dark chocolate.
Why did my chocolate develop white spots after setting?
Those white spots, called “bloom,” typically appear when chocolate isn’t properly tempered or experiences temperature fluctuations during storage. While perfectly safe to eat, bloom indicates that the cocoa butter has separated. To prevent this, ensure proper tempering or add a teaspoon of coconut oil to stabilize the chocolate.
Can I make these ahead for Valentine’s Day?
Definitely! These hearts can be made 2-3 weeks in advance and stored properly. They’re actually ideal for advance preparation, as the flavors meld beautifully over time, making them perfect for planning ahead for Valentine’s celebrations.
Is there a nut-free alternative to peanut butter?
Yes! Substitute the peanut butter with cookie butter (speculoos), sunflower seed butter, or chocolate hazelnut spread for equally delicious results. Each alternative creates a unique flavor profile while maintaining the creamy texture that makes these valentine hearts special.
How can I prevent air bubbles in my chocolate shells?
Air bubbles typically form when chocolate is poured into molds too quickly or at too high a temperature. Work with slightly cooled chocolate and tap the mold firmly on the counter several times after filling. Using a small food-safe paintbrush to apply the first layer also helps eliminate bubbles in detailed molds.

Chocolate Peanut Butter Valentines Heart
- Prep Time: 30 minutes
- Cook Time: 10 minutes
- Total Time: 40 minutes
- Yield: 12 hearts 1x
- Category: Dessert
- Method: Mixing, melting, piping, chilling
- Cuisine: Americaine
Description
Chocolate Peanut Butter Valentines Heart – A decadent treat featuring rich chocolate and creamy peanut butter, perfect for quick and easy Valentine’s Day indulgence.
Ingredients
- 10 oz (280g) high-quality dark chocolate (60-70% cocoa), chopped
- 2 tbsp (30g) unsalted butter
- 1 tsp vanilla extract
- 1 cup (250g) smooth peanut butter (natural or regular)
- 3/4 cup (90g) powdered sugar, sifted
- 4 tbsp (56g) unsalted butter, softened
- 1/4 tsp salt (omit if using salted peanut butter)
- 3 oz (85g) white chocolate or pink candy melts
- Sprinkles, edible glitter, or crushed freeze-dried raspberries (optional)
Instructions
- Step 1: Prepare the Chocolate Shell Begin by thoroughly cleaning your heart-shaped chocolate molds, ensuring they’re completely dry—any moisture will cause the chocolate to seize. Place the chopped dark chocolate and butter in a heatproof bowl. Create a double boiler by positioning the bowl over a pot of barely simmering water, making sure the bowl doesn’t touch the water. Stir gently until 75% melted, then remove from heat and continue stirring until completely smooth. Stir in the vanilla extract. If tempering properly, follow the temperature guidelines from the pro tips section. Let the chocolate cool slightly until it begins to thicken but remains pourable.
- Step 2: Create the First Chocolate Layer Using a small spoon or food-safe paintbrush, coat the inside of each heart cavity with a layer of chocolate. Pay special attention to the sides, ensuring they’re completely covered. Gently tap the mold on the counter to remove air bubbles and create an even coating. Place the mold in the refrigerator for 5-7 minutes until the chocolate is set but not completely hardened. Apply a second layer of chocolate to ensure a sturdy shell that won’t crack when filled. Return to the refrigerator for another 10 minutes until completely set.
- Step 3: Prepare the Peanut Butter Filling While the chocolate shells chill, make your filling. In a medium bowl, combine the peanut butter, softened butter, powdered sugar, and salt. Beat with an electric mixer on medium speed for 2-3 minutes until the mixture becomes lighter in color and fluffy. The texture should be smooth enough to pipe but firm enough to hold its shape. Transfer the peanut butter mixture to a piping bag fitted with a medium round tip or use a zip-top bag with the corner snipped off.
- Step 4: Fill and Seal the Hearts Remove the chocolate shells from the refrigerator. Pipe the peanut butter filling into each cavity, leaving about 1/8-inch space from the top. Smooth the surface with a small offset spatula or the back of a spoon. Reheat the remaining chocolate until fluid but not hot. Carefully spoon or pipe chocolate over the filling to seal each heart. Use an offset spatula to scrape away excess chocolate, creating a smooth base. Return to the refrigerator for 20-30 minutes to set completely.
- Step 5: Unmold and Decorate Once fully set, carefully unmold your **Chocolate Peanut Butter Valentines Hearts** by turning the mold over and gently tapping or flexing it. For decoration, melt white chocolate or pink candy melts in the microwave in 15-second intervals, stirring between each. Drizzle decoratively over the hearts using a fork or piping bag. While still wet, add sprinkles or edible decorations if desired. Allow decorations to set fully before packaging or serving your beautiful chocolate peanut butter hearts.
Notes
Fresh ingredients will always yield the best flavor results.
Nutrition
- Serving Size: 1 heart
- Calories: 250
- Sugar: 14g
- Sodium: 150mg
- Fat: 18g
- Saturated Fat: 8g
- Unsaturated Fat: 7g
- Trans Fat: 0g
- Carbohydrates: 20g
- Fiber: 3g
- Protein: 6g
- Cholesterol: 10mg


