

Velvety smooth and decadently rich, Homemade Chocolate Truffles melt in your mouth with an explosion of intense chocolate flavor that’s impossible to resist. These luxurious bite-sized confections may look like something from an upscale chocolatier, but they’re surprisingly simple to create in your own kitchen with just a handful of quality ingredients. Whether you’re treating yourself or preparing a thoughtful homemade gift, these Homemade Chocolate Truffles deliver a gourmet experience that store-bought versions simply can’t match. You’ll learn how to create perfect chocolate ganache, master the art of rolling and coating truffles, and customize these sweet treats to suit your taste preferences.
Why You’ll Love This Recipe
There’s something truly magical about crafting your own Homemade Chocolate Truffles. First, the sensory experience is unmatched—the silky-smooth ganache yields to create a luscious mouthfeel contrasted beautifully with the slight resistance of the outer chocolate coating or dusting. The rich aroma of premium chocolate fills your kitchen as you work, building anticipation for that first heavenly bite.
These chocolate confections offer incredible versatility, allowing you to customize flavors from classic dark chocolate to creative variations like espresso, orange, or sea salt caramel. Unlike commercial truffles with their long lists of preservatives and additives, your Homemade Chocolate Truffles contain only pure, pronounceable ingredients you can feel good about.
Best of all, despite their sophisticated appearance, these truffles require no specialized equipment or advanced techniques—just patience and attention to detail. The recipe’s forgiving nature makes it perfect for beginners, yet the results will impress even the most discerning chocolate connoisseurs. The remarkable contrast between their elegant appearance and simple preparation makes these treats perfect for holidays, dinner parties, or heartfelt homemade gifts.
Ingredients
For perfect Homemade Chocolate Truffles, quality ingredients make all the difference:
- 8 oz (225g) high-quality dark chocolate (70-75% cocoa), finely chopped
- 2/3 cup (160ml) heavy cream
- 2 tablespoons (28g) unsalted butter, room temperature
- 1 teaspoon pure vanilla extract
- 1/8 teaspoon fine sea salt
- 2 tablespoons (30ml) liqueur of choice (optional)
For coating:
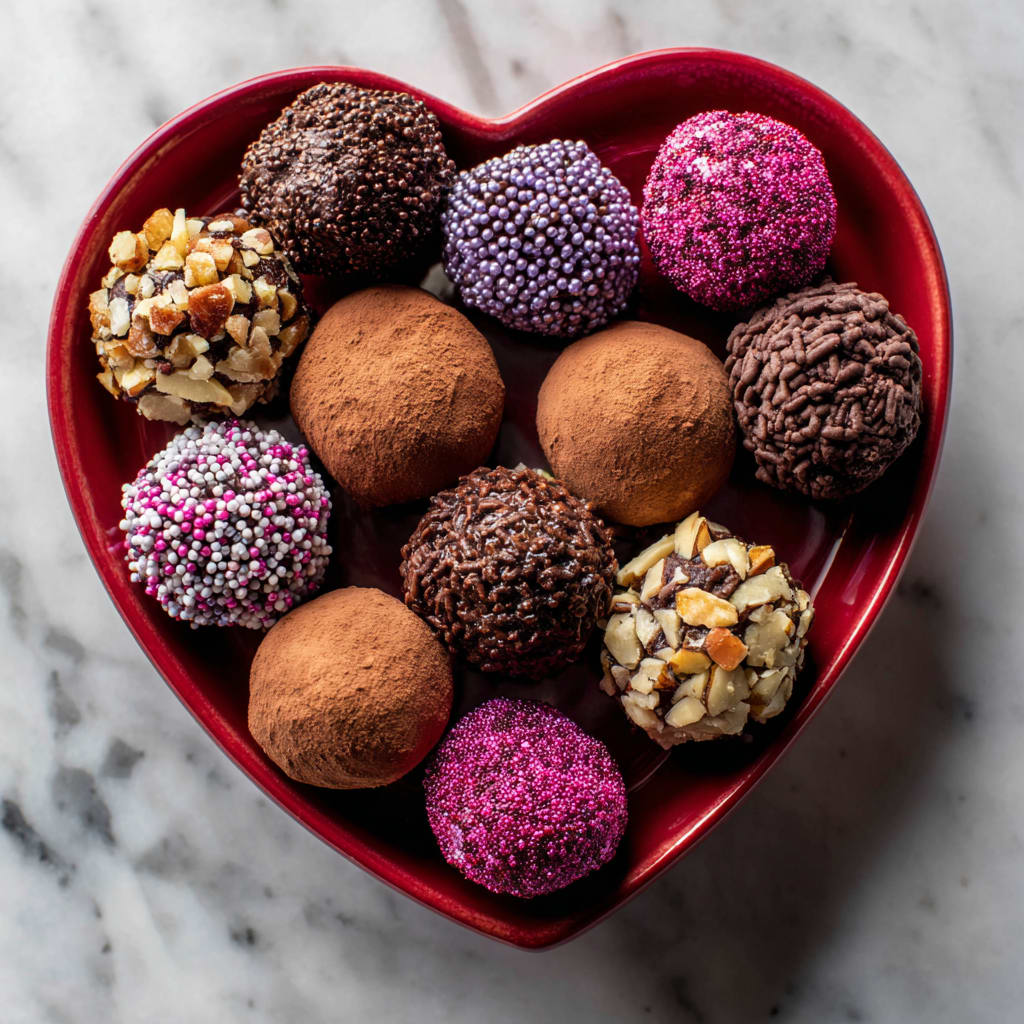
- 1/2 cup (50g) unsweetened cocoa powder
- 1/2 cup (50g) finely chopped nuts (pistachios, hazelnuts, or almonds)
- 8 oz (225g) additional dark or milk chocolate for dipping (optional)
The chocolate forms the foundation of your truffles, so select the highest quality you can find. Single-origin chocolate with 70-75% cocoa content offers complex flavor notes that elevate these simple chocolate treats to extraordinary status. Similarly, use fresh heavy cream with at least 35% fat content for the richest, most luxurious ganache texture in your chocolate truffle recipe.
Pro Tips
Master the Ganache: The secret to exceptional Homemade Chocolate Truffles lies in properly preparing the ganache. Heat cream just until tiny bubbles form around the edges (never boil), as overheated cream can make your ganache separate or grainy. When pouring over chocolate, ensure all pieces are submerged, then let sit undisturbed for 3-5 minutes before gently stirring. This patient approach melts the chocolate evenly without introducing air bubbles that could compromise texture.
Temperature Control: Temperature management is crucial at every stage. Allow your ganache to set at room temperature for 30 minutes before refrigerating for 2-3 hours until firm but still pliable. When rolling truffles, work with small batches, keeping the remaining mixture chilled. If your hands warm too quickly, dip fingertips in ice water and dry thoroughly between batches, or consider wearing thin food-safe gloves dusted with cocoa powder.
Coating Precision: For professional-looking Homemade Chocolate Truffles, perfect your coating technique. When using cocoa powder or nuts, roll truffles in coating immediately after shaping while they’re slightly tacky for better adhesion. For chocolate-dipped truffles, temper your chocolate properly (or use easy-melt chocolate wafers) and use a dipping fork to ensure thin, even coverage. Allow excess chocolate to drip off completely before placing on parchment, then immediately add any decorative toppings before the coating sets.
Instructions
Step 1: Prepare the Ganache
Begin by placing your finely chopped chocolate in a medium heat-proof bowl. The smaller you chop the chocolate, the more evenly it will melt. Pour heavy cream into a small saucepan and warm over medium-low heat until small bubbles form around the edges and it begins steaming (about 180°F/82°C). Immediately remove from heat and pour directly over the chocolate. Let stand undisturbed for 5 minutes to allow the hot cream to melt the chocolate.
Step 2: Create the Truffle Base
After allowing the cream and chocolate to marry, gently stir the mixture with a silicone spatula, starting from the center and moving outward in concentric circles until smooth and glossy. Avoid vigorous stirring which introduces air bubbles. Once combined, add room temperature butter, vanilla extract, salt, and optional liqueur (brandy, Grand Marnier, or Kahlúa work beautifully). Stir until completely incorporated. The ganache should look silky and have a uniform color without streaks.
Step 3: Chill the Ganache
Cover the bowl with plastic wrap, pressing it directly onto the surface of your ganache to prevent a skin from forming. Allow to cool at room temperature for 30 minutes, then transfer to the refrigerator for 2-3 hours until firm enough to scoop and roll but still slightly pliable. The ideal consistency is similar to modeling clay – firm but moldable.
Step 4: Shape the Truffles
Prepare your work surface by lining a baking sheet with parchment paper. Place your coating ingredients in separate shallow bowls. Using a 1-inch melon baller or teaspoon, scoop out portions of the chilled ganache. Quickly roll between your palms to form balls approximately 1-inch in diameter. Work with 4-6 truffles at a time, keeping the remaining ganache refrigerated to maintain proper consistency. If your hands warm the ganache too much, briefly chill your hands or wear food-safe gloves.
Step 5: Coat and Finish
Immediately roll each truffle in your coating of choice while still slightly tacky from handling. For cocoa-coated Homemade Chocolate Truffles, roll gently in unsweetened cocoa powder, then lightly shake off excess. For nut-coated truffles, roll in finely chopped nuts, pressing gently to adhere. For chocolate-dipped truffles, allow the shaped ganache balls to chill an additional 30 minutes before dipping in melted, tempered chocolate using a dipping fork. Let excess chocolate drip off completely before placing on parchment paper. If adding sprinkles or sea salt, do so before the coating sets.
Step 6: Set and Store
Allow your coated Homemade Chocolate Truffles to set completely on the parchment-lined baking sheet. For cocoa or nut-coated truffles, this takes approximately 1 hour at room temperature. For chocolate-dipped truffles, allow 2-3 hours or until the coating is completely firm. Once set, transfer to an airtight container, separating layers with parchment paper to prevent sticking. Properly stored, your decadent chocolate creations are ready to enjoy or gift!
Variations
Flavored Chocolate Truffles: Easily transform your basic Homemade Chocolate Truffles recipe by infusing the cream with complementary flavors. For mint chocolate truffles, steep 1/4 cup fresh mint leaves in the warm cream for 30 minutes before straining and reheating. Create orange-infused truffles by adding 2 teaspoons of orange zest to the cream, or craft espresso truffles by dissolving 1 tablespoon of instant espresso powder in the cream before heating. Each variation delivers a unique twist while maintaining that luxurious truffle texture.
Dietary Adaptations: These chocolate delights can accommodate various dietary needs without sacrificing flavor. For vegan chocolate truffles, substitute the heavy cream with full-fat coconut cream and use plant-based butter or coconut oil instead of dairy butter. Dairy-free chocolate chips work perfectly in this adaptation. To create gluten-free truffles, simply ensure your chocolate and flavorings are certified gluten-free. For lower-sugar options, use 85-90% dark chocolate and add a touch of monk fruit sweetener or stevia to achieve your desired sweetness level.
Textured Variations: Incorporate exciting textural elements into your Homemade Chocolate Truffles by folding 2 tablespoons of finely chopped dried fruit, toasted nuts, or even crispy rice cereal into the ganache before chilling. For a surprising center, freeze small portions of caramel, nut butter, or fruit preserves, then wrap your ganache around these fillings before coating. These creative adaptations transform simple chocolate truffles into multi-dimensional confections with delightful flavor and texture contrasts.
Storage and Serving
Your Homemade Chocolate Truffles will maintain peak freshness when stored in an airtight container in the refrigerator for up to two weeks. Layer them between sheets of parchment paper to prevent sticking and preserve their beautiful appearance. For longer storage, these chocolate confections can be frozen for up to three months—simply place the container in the refrigerator for 24 hours before bringing to room temperature for serving.
For the ultimate tasting experience, serve your truffles at room temperature, removing them from refrigeration about 30 minutes before enjoying. This allows the ganache to soften slightly, releasing its full flavor profile and achieving that melt-in-your-mouth consistency that makes Homemade Chocolate Truffles so irresistible.
Create an elegant dessert plate by arranging 2-3 truffles alongside fresh berries, a small scoop of vanilla ice cream, or a dollop of whipped cream. These chocolate treats pair beautifully with after-dinner coffee, espresso, or dessert wines like port or late-harvest Riesling. For a sophisticated presentation at gatherings, arrange various coated truffle varieties on a multi-tiered serving platter, labeling each type to guide your guests through a chocolate tasting experience they won’t soon forget.
FAQs
Why did my ganache separate or become grainy?
Separation typically occurs when cream is too hot or chocolate is overheated. To fix a separated ganache, gently warm it over a double boiler while adding 1-2 teaspoons of warm milk and stirring until smooth. For graininess, which suggests the cocoa butter has crystallized improperly, warm the mixture gently while stirring constantly until the crystals dissolve.
Can I make these truffles ahead for gifts?
Absolutely! Homemade Chocolate Truffles are perfect for gifting as they stay fresh in the refrigerator for up to two weeks. Package in decorative boxes with parchment between layers, and include a note to bring them to room temperature before enjoying for the best flavor experience.
My ganache is too soft to roll. What went wrong?
Your cream-to-chocolate ratio might be too high. Refrigerate the mixture for 30-minute increments until it reaches a rollable consistency. If it remains too soft, gradually incorporate 1-2 ounces of melted chocolate into the ganache, then chill again.
How can I prevent my truffles from melting while I roll them?
Work in a cool room and handle small batches (4-6 truffles) at a time, keeping the remaining ganache refrigerated. Chill your hands under cold water between batches, or wear food-safe gloves dusted with cocoa powder.
Can I use chocolate chips instead of baking chocolate?
While chocolate chips will work in a pinch for your Homemade Chocolate Truffles, they contain stabilizers that affect melting properties. For the smoothest, richest results, premium baking chocolate or chocolate bars with 70-75% cocoa content are recommended.

Homemade Chocolate Truffles Recipe
- Prep Time: 30 minutes
- Cook Time: 10 minutes
- Total Time: 3 hours 40 minutes
- Yield: 24 truffles 1x
- Category: Dessert
- Method: Mixing, Chilling, Rolling, Coating
- Cuisine: Americaine
Description
Homemade Chocolate Truffles Recipe: Indulgent dark chocolate truffles made with cream, butter, and cocoa – a decadent treat for any occasion.
Ingredients
- 8 oz (225g) high-quality dark chocolate (70-75% cocoa), finely chopped
- 2/3 cup (160ml) heavy cream
- 2 tablespoons (28g) unsalted butter, room temperature
- 1 teaspoon pure vanilla extract
- 1/8 teaspoon fine sea salt
- 2 tablespoons (30ml) liqueur of choice (optional)
- 1/2 cup (50g) unsweetened cocoa powder
- 1/2 cup (50g) finely chopped nuts (pistachios, hazelnuts, or almonds)
- 8 oz (225g) additional dark or milk chocolate for dipping (optional)
- 1 cup diced celery
- ½ cup sliced almonds
- 1 cup grapes, halved
- ¾ cup mayonnaise
- 1 tablespoon Dijon mustard
- 1 tablespoon lemon juice
- 1 teaspoon salt
- ½ teaspoon black pepper
- ¼ cup chopped fresh parsley
Instructions
- Step 1: Prepare the Ganache Begin by placing your finely chopped chocolate in a medium heat-proof bowl. The smaller you chop the chocolate, the more evenly it will melt. Pour heavy cream into a small saucepan and warm over medium-low heat until small bubbles form around the edges and it begins steaming (about 180°F/82°C). Immediately remove from heat and pour directly over the chocolate. Let stand undisturbed for 5 minutes to allow the hot cream to melt the chocolate.
- Step 2: Create the Truffle Base After allowing the cream and chocolate to marry, gently stir the mixture with a silicone spatula, starting from the center and moving outward in concentric circles until smooth and glossy. Avoid vigorous stirring which introduces air bubbles. Once combined, add room temperature butter, vanilla extract, salt, and optional liqueur (brandy, Grand Marnier, or Kahlúa work beautifully). Stir until completely incorporated. The ganache should look silky and have a uniform color without streaks.
- Step 3: Chill the Ganache Cover the bowl with plastic wrap, pressing it directly onto the surface of your ganache to prevent a skin from forming. Allow to cool at room temperature for 30 minutes, then transfer to the refrigerator for 2-3 hours until firm enough to scoop and roll but still slightly pliable. The ideal consistency is similar to modeling clay – firm but moldable.
- Step 4: Shape the Truffles Prepare your work surface by lining a baking sheet with parchment paper. Place your coating ingredients in separate shallow bowls. Using a 1-inch melon baller or teaspoon, scoop out portions of the chilled ganache. Quickly roll between your palms to form balls approximately 1-inch in diameter. Work with 4-6 truffles at a time, keeping the remaining ganache refrigerated to maintain proper consistency. If your hands warm the ganache too much, briefly chill your hands or wear food-safe gloves.
- Step 5: Coat and Finish Immediately roll each truffle in your coating of choice while still slightly tacky from handling. For cocoa-coated Homemade Chocolate Truffles, roll gently in unsweetened cocoa powder, then lightly shake off excess. For nut-coated truffles, roll in finely chopped nuts, pressing gently to adhere. For chocolate-dipped truffles, allow the shaped ganache balls to chill an additional 30 minutes before dipping in melted, tempered chocolate using a dipping fork. Let excess chocolate drip off completely before placing on parchment paper. If adding sprinkles or sea salt, do so before the coating sets.
- Step 6: Set and Store Allow your coated Homemade Chocolate Truffles to set completely on the parchment-lined baking sheet. For cocoa or nut-coated truffles, this takes approximately 1 hour at room temperature. For chocolate-dipped truffles, allow 2-3 hours or until the coating is completely firm. Once set, transfer to an airtight container, separating layers with parchment paper to prevent sticking. Properly stored, your decadent chocolate creations are ready to enjoy or gift!
Notes
Fresh ingredients will always yield the best flavor results.
Nutrition
- Serving Size: 1 truffle
- Calories: 105
- Sugar: 4g
- Sodium: 23mg
- Fat: 8g
- Saturated Fat: 5g
- Unsaturated Fat: 2g
- Trans Fat: 0g
- Carbohydrates: 7g
- Fiber: 1g
- Protein: 1g
- Cholesterol: 11mg


