
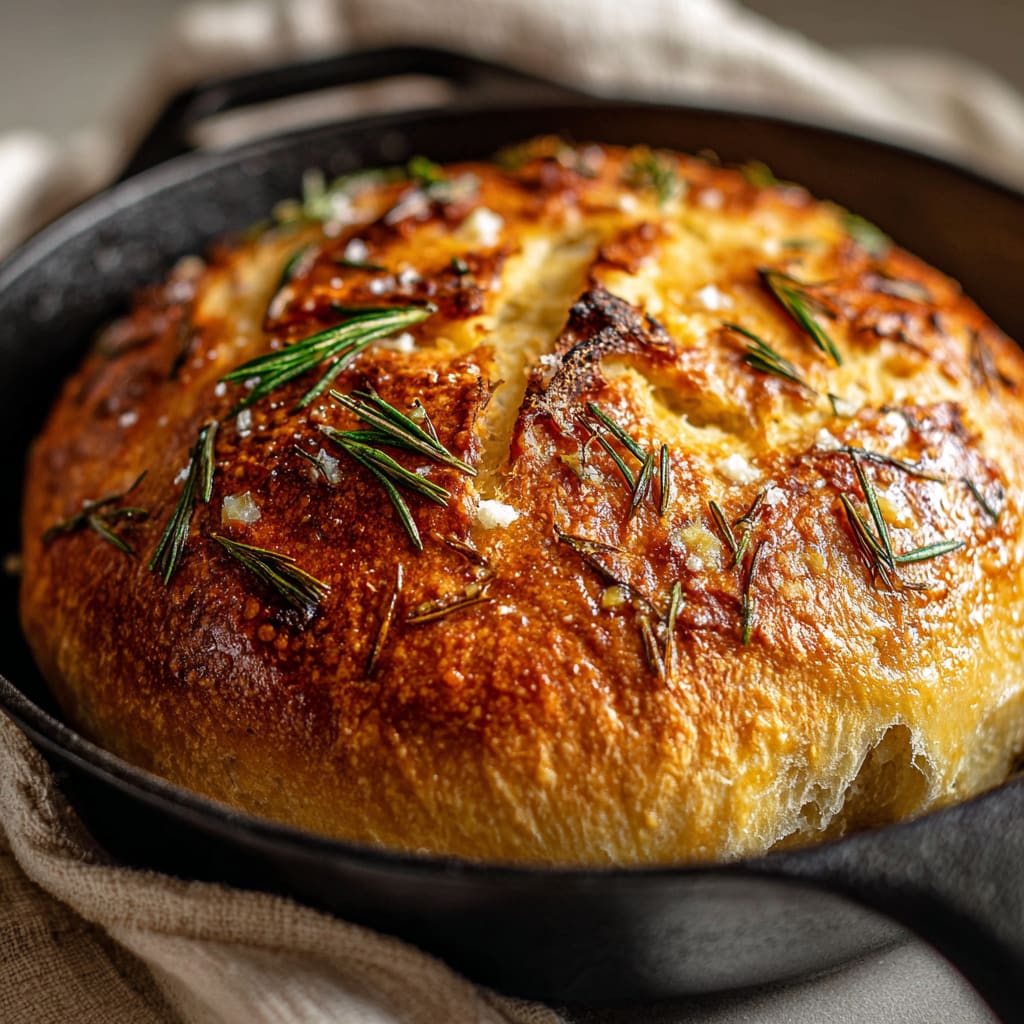
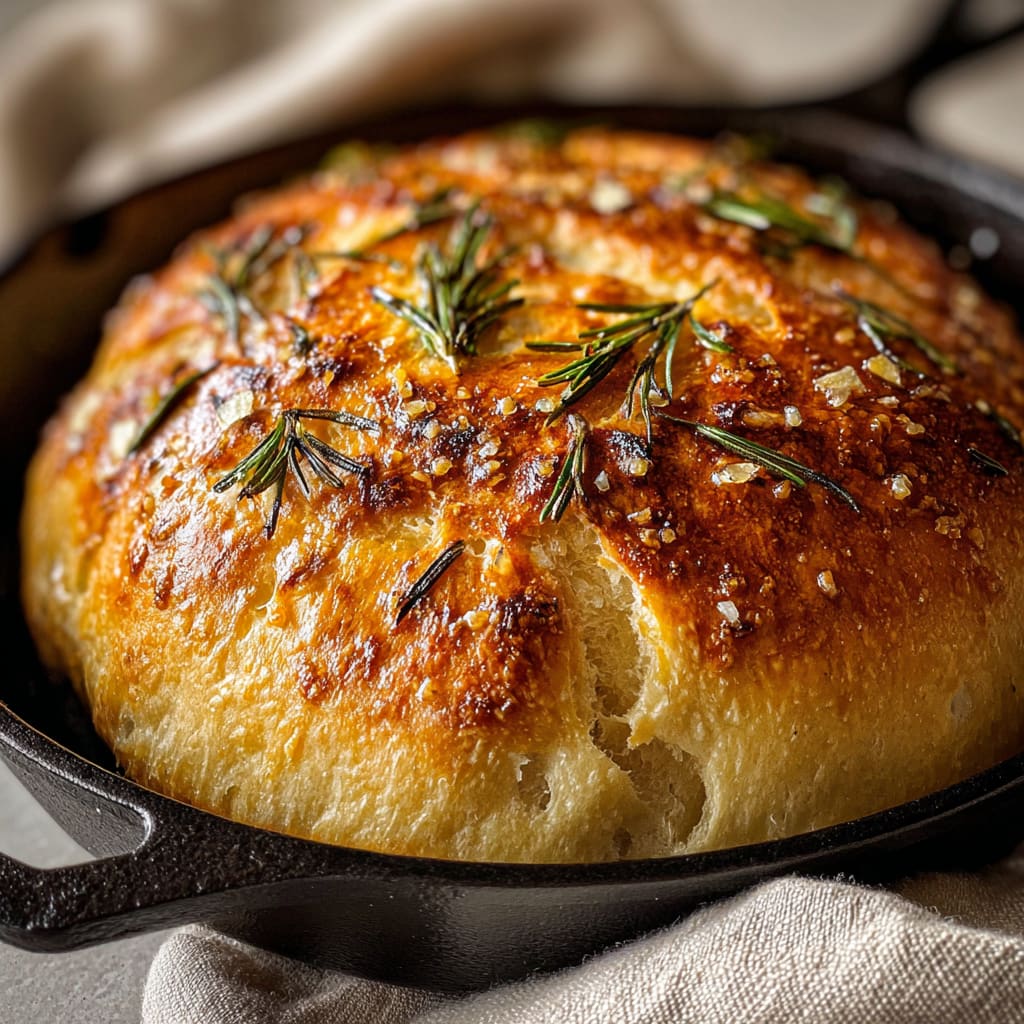
The aroma of freshly baked Rustic No Knead Rosemary Garlic Bread wafting through your home is truly one of life’s simple pleasures. This artisan-style bread boasts a perfectly crispy crust that gives way to a tender, airy interior infused with fragrant rosemary and pungent garlic. What makes this Rustic No Knead Rosemary Garlic Bread recipe special is its simplicity—requiring minimal effort while delivering bakery-quality results. You’ll learn how a long, slow fermentation creates incredible flavor and texture without any kneading, making this bread accessible even to novice bakers.
Why You’ll Love This Recipe
This Rustic No Knead Rosemary Garlic Bread will quickly become a staple in your baking repertoire for so many reasons. First, the contrast between the crackling, golden exterior and the soft, chewy interior creates an irresistible textural experience that store-bought bread simply cannot match. The marriage of aromatic rosemary and roasted garlic perfumes each slice, making it versatile enough to accompany soups, salads, or stand alone with just a swipe of good butter.
What truly sets this homemade garlic herb bread apart is its forgiving nature. The no-knead technique eliminates the intimidation factor of traditional bread baking—there’s no fussy kneading or precise timing required. Simply mix, wait, and bake. The long fermentation does all the work for you, developing complex flavors and gluten structure while you go about your day. Even if you’ve never baked bread before, you’ll achieve impressive results that will have family and friends convinced you’ve been hiding professional baking skills.
Ingredients
For this Rustic No Knead Rosemary Garlic Bread, you’ll need:
- 3 cups (375g) all-purpose flour
- 1¼ teaspoons (7g) salt
- ¼ teaspoon (1g) active dry yeast
- 1½ cups (355ml) warm water (about 110°F/43°C)
- 2 tablespoons (30ml) olive oil, plus extra for drizzling
- 3 cloves garlic, minced (about 1 tablespoon)
- 2 tablespoons fresh rosemary, chopped (or 2 teaspoons dried)
- 1 teaspoon coarse sea salt for topping
The flour provides the structure for your bread, while the small amount of yeast works slowly during the extended fermentation period. Fresh rosemary is preferred for its vibrant flavor, but dried works well in a pinch. For the garlic, fresh cloves offer the most aromatic quality, but pre-minced garlic can be substituted when necessary. The olive oil adds richness and helps create that beautiful golden crust that makes homemade rosemary bread so appealing.
Pro Tips
Choose the Right Vessel: For the perfect crust on your Rustic No Knead Rosemary Garlic Bread, use a Dutch oven or heavy covered pot. The enclosed environment creates steam, which is the secret to developing that professional-quality crackling crust. If you don’t have a Dutch oven, a covered ceramic casserole dish works well too.
Master the Folding Technique: Instead of kneading, this recipe uses a folding method during the second rise. When folding the dough, use wet hands to prevent sticking, and gently stretch and fold the edges toward the center, rotating the bowl quarter turns between folds. This builds structure while preserving the precious air bubbles that give your bread its open crumb.
Develop Flavor Through Time: The long fermentation is non-negotiable for developing the complex flavor of this garlic rosemary bread. While you might be tempted to rush the process, allowing at least 12-18 hours for the first rise makes all the difference. If your kitchen is particularly cold, extend the time slightly; if it’s warm, check the dough earlier. The dough should be dotted with bubbles and have doubled in size before proceeding.
Instructions
Step 1: Mix the Dry Ingredients
In a large mixing bowl, whisk together the flour, salt, and yeast until well combined. This ensures even distribution of the yeast throughout the dough, which will lead to consistent fermentation and rising.
Step 2: Prepare the Aromatic Elements
In a small skillet, warm 1 tablespoon of olive oil over medium-low heat. Add the minced garlic and cook for 1-2 minutes until fragrant but not browned. Remove from heat and stir in the chopped rosemary. Allow this mixture to cool slightly before adding to the dough.
Step 3: Form the Dough
Pour the warm water into the dry ingredients, then add the cooled garlic-rosemary mixture and remaining olive oil. Stir with a wooden spoon or spatula until a shaggy, sticky dough forms. The dough will look rough and uneven—this is exactly what you want! Make sure all flour is incorporated, but don’t overmix.
Step 4: First Rise
Cover the bowl with plastic wrap or a damp kitchen towel and let it sit at room temperature (about 70°F/21°C) for 12-18 hours. The long, slow fermentation is where the magic happens—your dough will develop flavor and structure without any kneading.
Step 5: Shape the Loaf
When the dough has doubled in size and the surface is dotted with bubbles, it’s ready. Flour your work surface generously. With floured hands, gently scrape the dough onto the surface—it will be very sticky. Instead of kneading, fold the dough over itself 4-5 times, then shape it into a rough ball by pulling the edges toward the center.
Step 6: Second Rise
Place a piece of parchment paper in a bowl and dust with flour. Transfer your dough ball to this parchment, seam side down. Cover with a kitchen towel and let rise for another 1-2 hours until nearly doubled in size.
Step 7: Preheat and Prepare
About 30 minutes before baking, place your Dutch oven with the lid on in the oven and preheat to 450°F (230°C). The preheated pot creates instant steam when the dough is added.
Step 8: Bake to Perfection
When ready to bake, carefully remove the hot pot from the oven. Lift the dough by the parchment paper and lower it into the pot. Drizzle with a little olive oil and sprinkle with coarse sea salt and a few extra rosemary leaves if desired. Cover with the lid and bake for 30 minutes. Then remove the lid and bake for another 10-15 minutes until the crust is deep golden brown.
Step 9: Cool Properly
Transfer your Rustic No Knead Rosemary Garlic Bread to a wire rack and let it cool for at least 1 hour before slicing. This cooling period is crucial as it allows the crumb structure to set and the flavors to develop fully.
Variations
Mediterranean Version: Transform your Rustic No Knead Rosemary Garlic Bread into a Mediterranean masterpiece by adding ½ cup of pitted, chopped Kalamata olives and ¼ cup of crumbled feta cheese to the dough. The olives provide briny notes while the feta adds pockets of salty creaminess. Finish with a sprinkle of dried oregano on top before baking for an additional herb layer.
Whole Wheat Option: For a heartier, more nutritious loaf, substitute up to half of the all-purpose flour with whole wheat flour. This creates a slightly denser texture with a nutty flavor profile that pairs beautifully with the rosemary and garlic. You may need to add an extra 2-3 tablespoons of water, as whole wheat flour absorbs more moisture than all-purpose.
Cheese-Crusted Variation: For an indulgent twist, mix ½ cup of grated Parmesan or Pecorino Romano into the dough. Then, before baking, sprinkle another ¼ cup over the top of the loaf. The cheese will form a savory, crispy crust that elevates this homemade rosemary garlic bread to dinner party status.
Storage and Serving
This Rustic No Knead Rosemary Garlic Bread stays fresh at room temperature, stored in a paper bag or wrapped in a clean kitchen towel, for up to 2 days. For longer storage, slice the cooled bread and freeze it in an airtight container or freezer bag for up to 3 months. Reheat frozen slices directly in the toaster or thaw and warm in a 350°F (175°C) oven for about 10 minutes to revive the crust.
Serve this aromatic bread alongside a bowl of hearty minestrone or tomato soup for a comforting meal. For an impressive appetizer, slice the bread thinly, brush with olive oil, and toast to make crostini topped with ricotta and honey or a fresh tomato bruschetta mixture. This bread also makes exceptional sandwiches—try it with roasted vegetables and goat cheese for a vegetarian option that showcases the rosemary and garlic flavors.
FAQs
Can I use instant yeast instead of active dry yeast?
Yes, you can substitute instant yeast for active dry yeast in equal amounts in this Rustic No Knead Rosemary Garlic Bread. The advantage of instant yeast is that it doesn’t need to be activated in water first.
Why is my bread dense instead of airy?
Dense bread usually results from either underproofing or overhandling the dough. Make sure you’re giving the dough enough time for both rises and handling it very gently to preserve air bubbles. Also check that your yeast is fresh and active.
Can I make this bread gluten-free?
While you can experiment with gluten-free flour blends, this specific no-knead technique relies heavily on gluten development during the long fermentation. A direct substitution will yield different results, so a recipe specifically designed for gluten-free bread would be better.
How do I know when my bread is done baking?
Your Rustic No Knead Rosemary Garlic Bread is done when the crust is deep golden brown and the bottom sounds hollow when tapped. If you have an instant-read thermometer, the internal temperature should reach about 205-210°F (96-99°C).
Can I add other herbs besides rosemary?
Absolutely! Thyme, sage, or oregano work beautifully in this recipe, either as a replacement for rosemary or in combination. Just maintain the same total quantity of herbs to keep the flavor balanced.
Rustic No Knead Rosemary Garlic Bread
- Prep Time: 20 minutes
- Cook Time: 45 minutes
- Total Time: 13 hours 5 minutes
- Yield: 1 loaf 1x
- Category: Dinner
- Method: Baking
- Cuisine: Americaine
Description
Rustic No Knead Rosemary Garlic Bread – Easy, aromatic, crowd-pleasing bread with fresh rosemary and garlic. Perfect for cozy nights in!
Ingredients
- 3 cups (375g) all-purpose flour
- 1¼ teaspoons (7g) salt
- ¼ teaspoon (1g) active dry yeast
- 1½ cups (355ml) warm water (about 110°F/43°C)
- 2 tablespoons (30ml) olive oil, plus extra for drizzling
- 3 cloves garlic, minced (about 1 tablespoon)
- 2 tablespoons fresh rosemary, chopped (or 2 teaspoons dried)
- 1 teaspoon coarse sea salt for topping
Instructions
- Step 1: Mix the Dry Ingredients In a large mixing bowl, whisk together the flour, salt, and yeast until well combined. This ensures even distribution of the yeast throughout the dough, which will lead to consistent fermentation and rising.
- Step 2: Prepare the Aromatic Elements In a small skillet, warm 1 tablespoon of olive oil over medium-low heat. Add the minced garlic and cook for 1-2 minutes until fragrant but not browned. Remove from heat and stir in the chopped rosemary. Allow this mixture to cool slightly before adding to the dough.
- Step 3: Form the Dough Pour the warm water into the dry ingredients, then add the cooled garlic-rosemary mixture and remaining olive oil. Stir with a wooden spoon or spatula until a shaggy, sticky dough forms. The dough will look rough and uneven—this is exactly what you want! Make sure all flour is incorporated, but don’t overmix.
- Step 4: First Rise Cover the bowl with plastic wrap or a damp kitchen towel and let it sit at room temperature (about 70°F/21°C) for 12-18 hours. The long, slow fermentation is where the magic happens—your dough will develop flavor and structure without any kneading.
- Step 5: Shape the Loaf When the dough has doubled in size and the surface is dotted with bubbles, it’s ready. Flour your work surface generously. With floured hands, gently scrape the dough onto the surface—it will be very sticky. Instead of kneading, fold the dough over itself 4-5 times, then shape it into a rough ball by pulling the edges toward the center.
- Step 6: Second Rise Place a piece of parchment paper in a bowl and dust with flour. Transfer your dough ball to this parchment, seam side down. Cover with a kitchen towel and let rise for another 1-2 hours until nearly doubled in size.
- Step 7: Preheat and Prepare About 30 minutes before baking, place your Dutch oven with the lid on in the oven and preheat to 450°F (230°C). The preheated pot creates instant steam when the dough is added.
- Step 8: Bake to Perfection When ready to bake, carefully remove the hot pot from the oven. Lift the dough by the parchment paper and lower it into the pot. Drizzle with a little olive oil and sprinkle with coarse sea salt and a few extra rosemary leaves if desired. Cover with the lid and bake for 30 minutes. Then remove the lid and bake for another 10-15 minutes until the crust is deep golden brown.
- Step 9: Cool Properly Transfer your Rustic No Knead Rosemary Garlic Bread to a wire rack and let it cool for at least 1 hour before slicing. This cooling period is crucial as it allows the crumb structure to set and the flavors to develop fully.
Notes
Fresh ingredients will always yield the best flavor results.
Nutrition
- Serving Size: 1 slice (estimated)
- Calories: 200 calories per serving (estimated)
- Sugar: 1g (estimated)
- Sodium: 450mg (estimated)
- Fat: 5g (estimated)
- Saturated Fat: 1g (estimated)
- Unsaturated Fat: 4g (estimated)
- Trans Fat: 0g (estimated)
- Carbohydrates: 33g (estimated)
- Fiber: 2g (estimated)
- Protein: 5g (estimated)
- Cholesterol: 0mg (estimated)


