
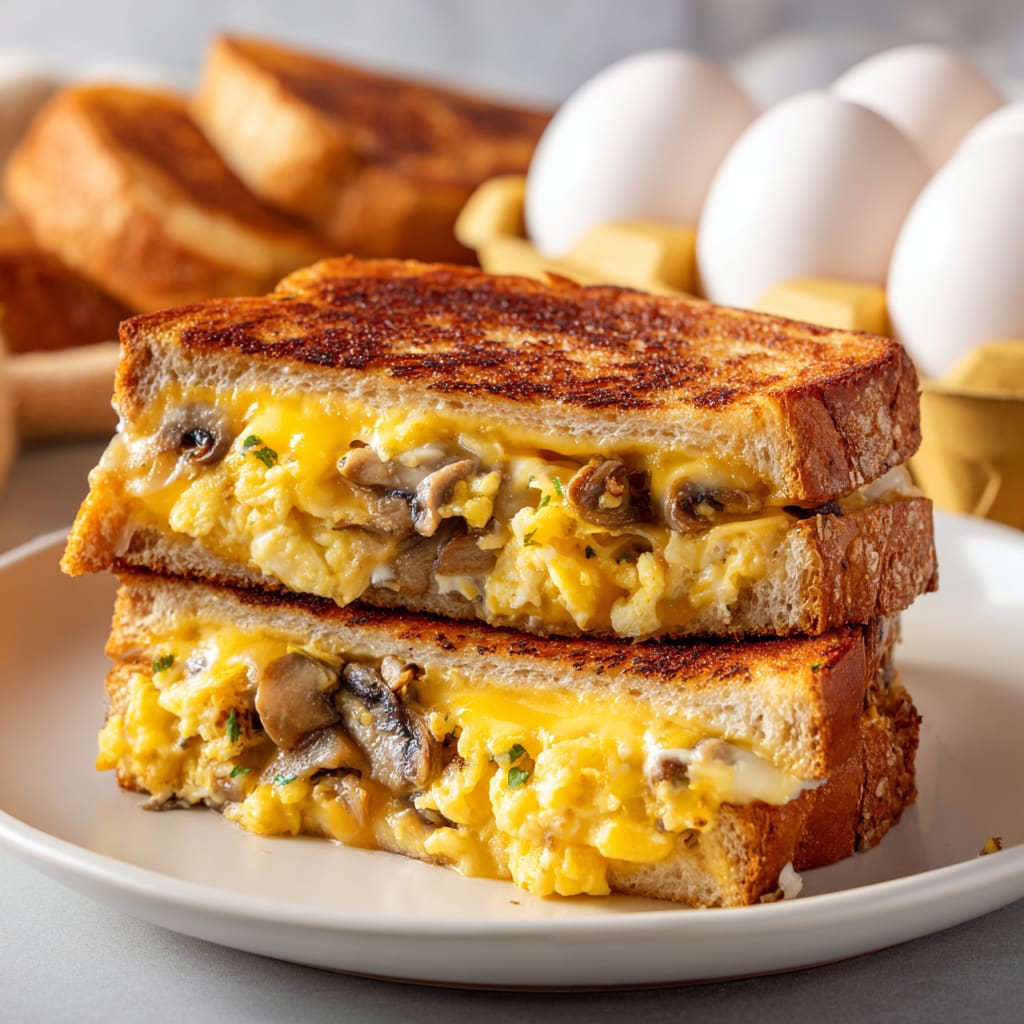
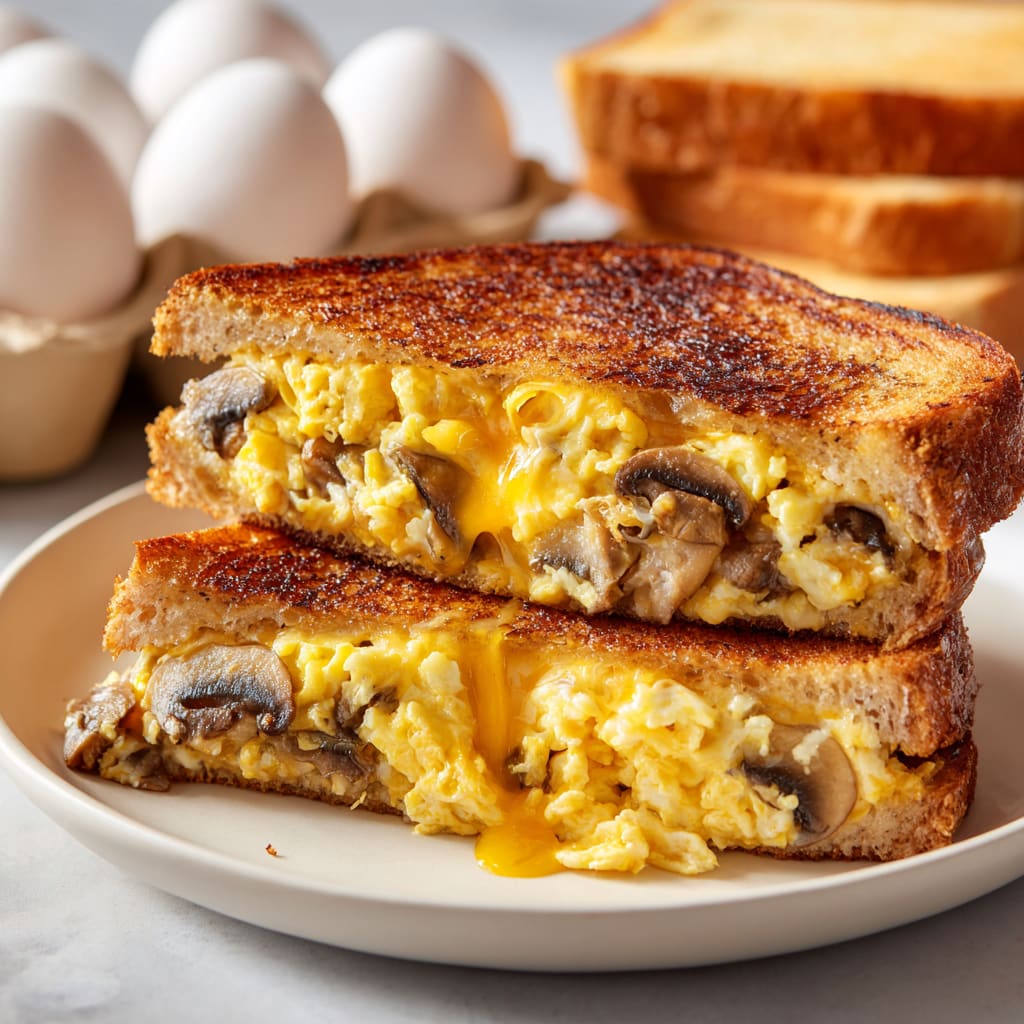
Imagine sinking your teeth into a perfectly golden Brick Grilled Cheese with a crispy, buttery exterior that gives way to a molten center of gooey, stretchy cheese. This isn’t your ordinary sandwich—it’s comfort food elevated to an art form. The Brick Grilled Cheese technique transforms the classic grilled cheese into something extraordinary by using a weighted press that creates the perfect crust while ensuring even melting throughout. This method dates back generations but has recently seen a revival in home kitchens across America. You’ll learn how to achieve the ideal balance of crunch and melt, which cheeses work best, and clever variations to keep this simple yet satisfying meal exciting every time you make it.
Why You’ll Love This Recipe
The Brick Grilled Cheese stands out from standard grilled cheese sandwiches in ways that will make you never want to return to the basic version again. First, the pressing technique creates a textural masterpiece—the exterior develops an incredibly even golden-brown crust with a satisfying crunch that contrasts beautifully with the velvety cheese interior.
The weighting method also ensures the bread makes complete contact with your cooking surface, eliminating those frustrating uneven spots that can occur with traditional methods. Every bite delivers the perfect ratio of crispy exterior to melty interior.
What’s more, this technique actually reduces cooking time compared to conventional methods. The weight helps conduct heat more efficiently through the sandwich, resulting in faster, more even melting without burning the bread.
For cheese lovers, the Brick Grilled Cheese method yields that Instagram-worthy cheese pull that’s both visually stunning and utterly satisfying. The pressure from the weight helps the cheeses meld together into a cohesive, stretchy blend that creates those dramatic, photo-perfect moments when you pull the sandwich halves apart.
Ingredients
• 2 slices high-quality sourdough bread (½ inch thick slices)
• 2 tablespoons unsalted butter, softened to room temperature
• 2 ounces (about ½ cup) sharp cheddar cheese, freshly grated
• 2 ounces (about ½ cup) low-moisture mozzarella, freshly grated
• 1 ounce (about ¼ cup) Gruyère cheese, freshly grated
• ¼ teaspoon garlic powder (optional)
• ⅛ teaspoon freshly ground black pepper
• Pinch of sea salt
• 1 teaspoon Dijon mustard (optional)
• Non-stick cooking spray or additional butter for the pan
The foundation of a perfect Brick Grilled Cheese begins with quality ingredients. Use artisanal bread with a sturdy structure—sourdough works exceptionally well as it stands up to the pressing technique without becoming too compressed. Always grate your cheese fresh rather than using pre-shredded varieties, as fresh cheese melts more smoothly without the anti-caking agents found in packaged options.
Pro Tips
Create a Cheese Blend: The secret to an exceptional Brick Grilled Cheese lies in combining different cheeses. A good formula to follow is using one cheese for flavor (sharp cheddar), one for melt factor (mozzarella), and one for complexity (Gruyère or fontina). This combination ensures you get the perfect texture and depth of flavor that elevates your sandwich beyond the ordinary.
Temperature Control Is Everything: Start with a cold pan and heat it slowly to medium-low. This gradual approach allows the cheese to melt completely before the bread browns too much. If your heat is too high, you’ll end up with burned bread and cold, unmelted cheese in the center—the cardinal sin of grilled cheese making. Give your sandwich 3-4 minutes per side, adjusting the heat as needed.
The Weight Technique: The “brick” in Brick Grilled Cheese refers to the weight placed on top of the sandwich while cooking. While you can use an actual brick wrapped in foil (clean and dedicated to cooking), a cast-iron press or even a heavy skillet works perfectly. Apply the weight gently after the first flip to prevent the filling from squeezing out. This pressure ensures even contact with the cooking surface and creates that signature compressed, crispy exterior while helping the cheese melt uniformly.
Instructions
Step 1: Prepare Your Materials
Before heating anything, gather all your ingredients and tools. If using a brick or press as your weight, wrap it in aluminum foil to keep it clean. Grate all cheeses and combine them in a bowl with the garlic powder, pepper, and salt. This cheese mixture creates the perfect melt consistency for your Brick Grilled Cheese and ensures even distribution of flavors.
Step 2: Build Your Sandwich
Spread butter evenly on one side of each bread slice—this will be the exterior of your sandwich. On the non-buttered side of one slice, spread the optional Dijon mustard for a subtle tang that complements the rich cheeses. Place half of your cheese mixture on top of the mustard, distribute evenly, then add the remaining cheese. Place the second slice of bread on top, buttered side facing outward. Press gently to compact the sandwich slightly before cooking.
Step 3: Start the Cooking Process
Place your skillet over medium-low heat and allow it to warm gradually. Once the pan is evenly heated (test by sprinkling a few drops of water—they should sizzle gently), place your sandwich in the center of the pan. Cook undisturbed for about 2 minutes until the bottom begins to turn golden brown.
Step 4: Apply the Brick Technique
Using a spatula, carefully flip the sandwich over. Immediately place your wrapped brick or press gently on top of the sandwich. The weight should be substantial enough to press the sandwich down but not so heavy that it forces the cheese out. This is the signature step that makes the Brick Grilled Cheese technique special, creating even browning and helping the cheese melt perfectly.
Step 5: Finish and Serve
After 2-3 more minutes with the weight applied, check the bottom of the sandwich for even browning. If needed, flip once more for 30 seconds without the weight to ensure both sides are perfectly crisp. Remove from heat, let rest for 30 seconds (this helps set the cheese slightly), then slice diagonally and serve immediately while the cheese is at its peak melting point.
Variations
Southwest Brick Grilled Cheese
Transform your basic Brick Grilled Cheese into a Tex-Mex delight by adding thin slices of tomato, chopped pickled jalapeños, and substituting pepper jack for the mozzarella. Sprinkle in a pinch of cumin and chili powder to your cheese mixture before assembling. After cooking, serve with a side of fresh salsa or guacamole for dipping. This variation adds a pleasant heat and acidity that cuts through the richness of the cheese.
Mediterranean Brick Pressed Sandwich
For a sophisticated twist, spread 1 tablespoon of pesto on the inside of one bread slice instead of mustard. Layer in thin slices of roasted red pepper, a few fresh basil leaves, and substitute feta for the cheddar while keeping the mozzarella. The pressing technique works beautifully with these ingredients, allowing the flavors to meld together while creating a more compact sandwich that’s easier to eat. The feta adds a tangy saltiness that balances the sweet peppers perfectly.
Dessert Grilled Cheese
Yes, the Brick Grilled Cheese technique works for sweet versions too! Use brioche or challah bread, spread the outside with butter and the inside with a thin layer of cream cheese. Add 1-2 tablespoons of Nutella, a few thin slices of strawberry or banana, and a sprinkle of mascarpone cheese. Press using the brick method over lower heat to prevent burning the sugars. Dust with powdered sugar before serving for an indulgent dessert sandwich.
Storage and Serving
The Brick Grilled Cheese is at its absolute best when served immediately after cooking, while the exterior remains crispy and the cheese is perfectly molten. However, if you need to make them ahead for a crowd, you can keep them warm in a 200°F oven for up to 15 minutes. Place them on a wire rack over a baking sheet to maintain their crispness rather than directly on the sheet, which can cause sogginess.
For leftovers (though they rarely exist!), wrap any remaining portions in parchment paper, then aluminum foil, and refrigerate for up to 2 days. Reheat in a dry skillet over medium-low heat to restore some crispness, or use a toaster oven at 325°F for 5-7 minutes.
Serving suggestions that complement the Brick Grilled Cheese perfectly include:
– A cup of roasted tomato soup for the classic dipping combination
– A crisp green salad dressed with vinaigrette to cut through the richness
– Quick-pickled vegetables like cucumber or red onion that add acidity and crunch
– A small bowl of tomato jam or caramelized onion chutney for sophisticated dipping
FAQs
What’s the difference between a regular grilled cheese and a Brick Grilled Cheese?
The Brick Grilled Cheese uses a weighted pressing technique during cooking, resulting in a more evenly browned exterior, better cheese melting, and a more compact sandwich with excellent textural contrast. The weight helps conduct heat more efficiently through the sandwich.
Can I use a panini press instead of the brick method?
Yes! A panini press works as an excellent alternative to the traditional brick method. Set it to medium heat and cook until the cheese is melted and the exterior is golden brown, typically 3-4 minutes.
Why is my cheese not melting before the bread burns?
You’re likely using too high heat. The secret to perfect Brick Grilled Cheese is cooking low and slow. Start with a cold pan and medium-low heat, allowing the cheese to melt as the bread gradually browns.
Should I cover the pan while cooking?
No need with the brick method, as the weight already helps conduct heat to the cheese. Covering could trap steam and make the bread soggy instead of crispy.
Can I prepare Brick Grilled Cheese sandwiches in advance?
You can assemble them up to 4 hours ahead (kept refrigerated), but cooking should happen just before serving for the best texture and cheese-pull experience.

Break Grilled Cheese
- Prep Time: 15 mins
- Cook Time: 30 mins
- Total Time: 45 mins
- Yield: 4 servings 1x
- Category: Breakfast
- Method: Cooking
- Cuisine: Americaine
Description
Learn how to break grilled cheese naturally with our easy recipe. Discover the best tips for a delicious sandwich!
Ingredients
- 2 slices high-quality sourdough bread (½ inch thick slices)
- 2 tablespoons unsalted butter, softened to room temperature
- 2 ounces (about ½ cup) sharp cheddar cheese, freshly grated
- 2 ounces (about ½ cup) low-moisture mozzarella, freshly grated
- 1 ounce (about ¼ cup) Gruyère cheese, freshly grated
- ¼ teaspoon garlic powder (optional)
- ⅛ teaspoon freshly ground black pepper
- Pinch of sea salt
- 1 teaspoon Dijon mustard (optional)
- Non-stick cooking spray or additional butter for the pan
Instructions
- Step 1: Prepare Your Materials Before heating anything, gather all your ingredients and tools. If using a brick or press as your weight, wrap it in aluminum foil to keep it clean. Grate all cheeses and combine them in a bowl with the garlic powder, pepper, and salt. This cheese mixture creates the perfect melt consistency for your Brick Grilled Cheese and ensures even distribution of flavors.
- Step 2: Build Your Sandwich Spread butter evenly on one side of each bread slice—this will be the exterior of your sandwich. On the non-buttered side of one slice, spread the optional Dijon mustard for a subtle tang that complements the rich cheeses. Place half of your cheese mixture on top of the mustard, distribute evenly, then add the remaining cheese. Place the second slice of bread on top, buttered side facing outward. Press gently to compact the sandwich slightly before cooking.
- Step 3: Start the Cooking Process Place your skillet over medium-low heat and allow it to warm gradually. Once the pan is evenly heated (test by sprinkling a few drops of water—they should sizzle gently), place your sandwich in the center of the pan. Cook undisturbed for about 2 minutes until the bottom begins to turn golden brown.
- Step 4: Apply the Brick Technique Using a spatula, carefully flip the sandwich over. Immediately place your wrapped brick or press gently on top of the sandwich. The weight should be substantial enough to press the sandwich down but not so heavy that it forces the cheese out. This is the signature step that makes the Brick Grilled Cheese technique special, creating even browning and helping the cheese melt perfectly.
- Step 5: Finish and Serve After 2-3 more minutes with the weight applied, check the bottom of the sandwich for even browning. If needed, flip once more for 30 seconds without the weight to ensure both sides are perfectly crisp. Remove from heat, let rest for 30 seconds (this helps set the cheese slightly), then slice diagonally and serve immediately while the cheese is at its peak melting point.
Notes
Fresh ingredients will always yield the best flavor results.
Nutrition
- Serving Size: 1 serving
- Calories: 300
- Sugar: 5g
- Sodium: 400mg
- Fat: 10g
- Saturated Fat: 3g
- Unsaturated Fat: 7g
- Trans Fat: 0g
- Carbohydrates: 40g
- Fiber: 5g
- Protein: 15g
- Cholesterol: 50mg


