
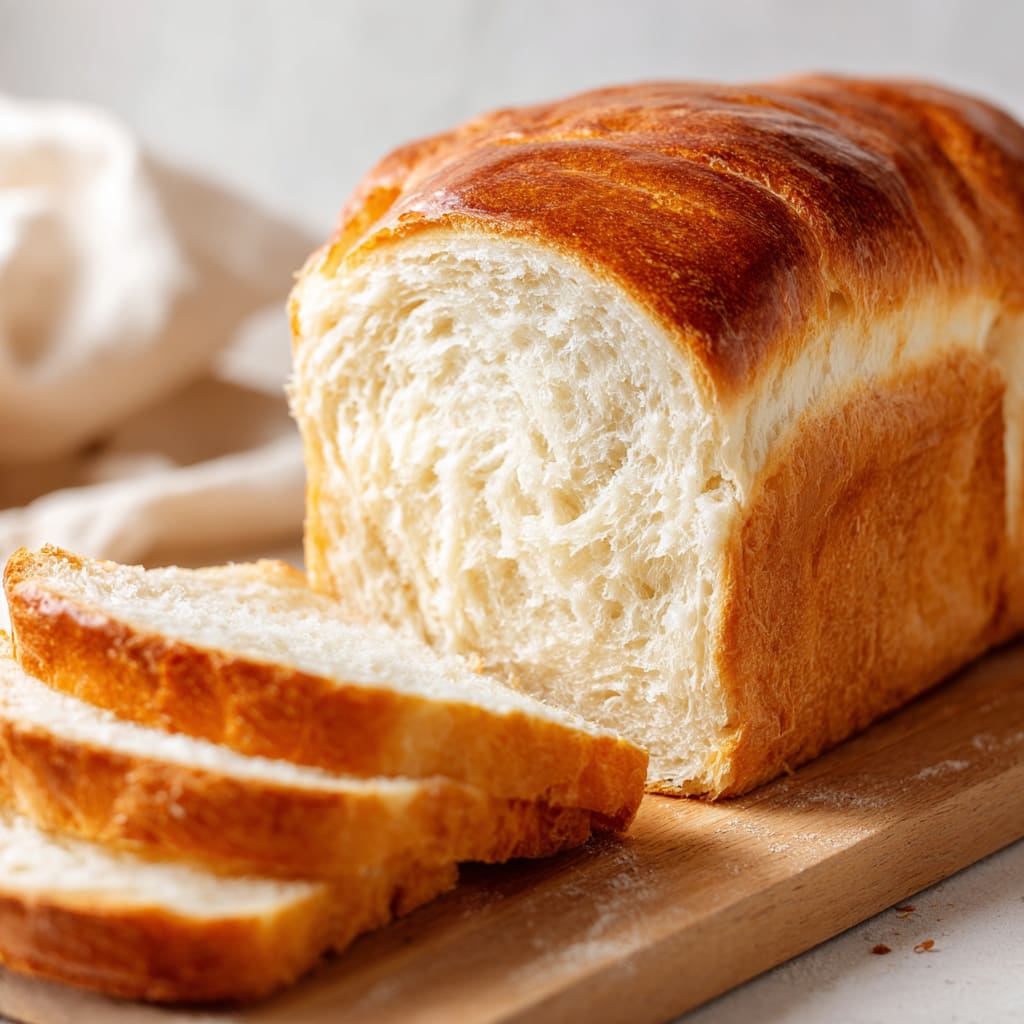
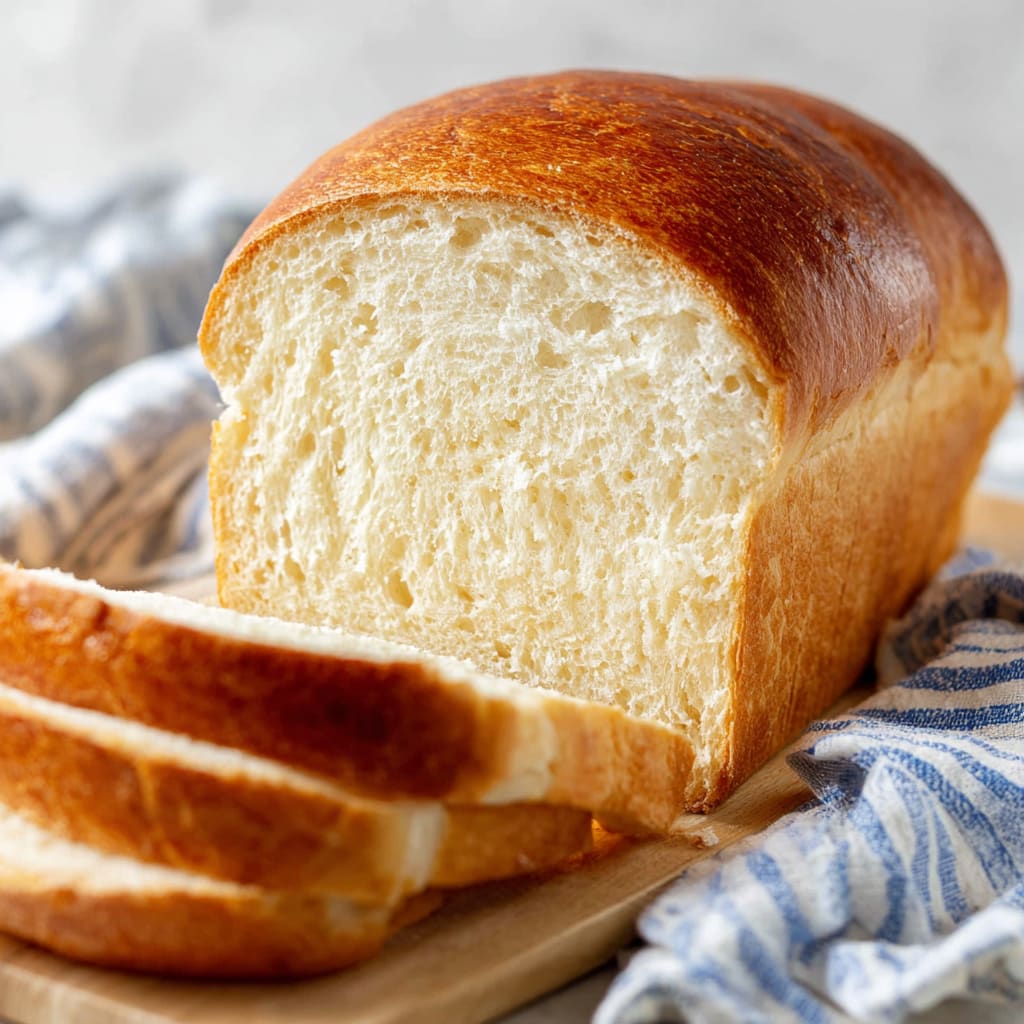
The aroma of freshly baked white bread wafting through your kitchen is one of life’s simple yet extraordinary pleasures. This classic white bread recipe yields two perfectly golden loaves with a tender, pillowy interior and a slightly crisp, buttery crust that will make your mouth water before you even take the first bite. Whether you’re a seasoned baker or just starting your bread-making journey, this foolproof recipe delivers consistent, bakery-quality results right in your home kitchen. You’ll learn how to create that perfect texture, achieve a beautiful rise, and master the techniques that make homemade white bread irresistibly better than anything store-bought.
Why You’ll Love This Recipe
This white bread recipe stands out from the rest for several compelling reasons. First, it strikes the perfect balance between simplicity and spectacular results – using basic pantry ingredients to create something truly special. The contrast between the soft, fluffy interior and the slightly chewy golden crust creates a textural harmony that’s absolutely divine.
Unlike many commercial breads loaded with preservatives and additives, this homemade version lets the pure, comforting flavor of freshly baked bread shine through. The touch of honey adds just a hint of sweetness that complements both sweet toppings like jam and savory applications like sandwiches.
The recipe is also incredibly versatile – once you master the basic technique, you can easily customize it with herbs, seeds, or different flours. Best of all, there’s something deeply satisfying about the process itself – the therapeutic kneading, watching the dough rise, and finally pulling those perfect loaves from the oven. The sense of accomplishment rivals even the delicious taste of the bread itself.
Ingredients List for the White Bread Recipe
These simple, quality ingredients work together to create the perfect loaf – the proper ratio of flour to liquid creates ideal texture, while the honey and butter add subtle richness that elevates this bread above basic recipes.
- 1 ⅔ cups lukewarm water (divided)
- 2 ¼ teaspoon instant yeast (or active dry yeast)
- 1 teaspoon sugar
- 1 tablespoon honey ((or more sugar))
- 1 teaspoon salt
- 1 ½ tablespoons unsalted butter (cubed at room temperature)
- 4 ½ cups all-purpose flour (divided)
- 1 ½ tablespoons butter (melted for brushing)
Pro Tips
For truly exceptional homemade white bread, these three professional techniques make all the difference:
First, temperature matters significantly. Your water should be lukewarm (about 105-110°F) – too hot will kill the yeast, while too cold will slow activation. Similarly, ensure your kitchen is draft-free during rising, as consistent warmth creates the best rise. Some bakers place their dough near a preheating oven or in a turned-off oven with the light on to create the ideal environment.
Second, proper kneading is crucial but often misunderstood. Rather than exhausting yourself, focus on technique – use the heel of your hand to push the dough away from you, then fold it back over itself repeatedly. When perfectly kneaded, the dough should pass the “windowpane test” – a small piece should stretch thin enough to see light through without tearing.
Lastly, don’t rush the cooling process. While the temptation to slice into warm bread is nearly irresistible, allowing the bread to cool completely (at least 1-2 hours) allows the interior structure to set properly. Cutting too soon results in a gummy texture and squashed slices. Patience truly yields the perfect loaf.
Instructions
Step 1: In the bowl of a stand mixer fitted with the dough hook combine the instant yeast, sugar, and half of the lukewarm water. Let sit for 5-10 minutes until foamy (if using active dry yeast, let sit for 15 minutes).
Step 2: Add the remaining water, honey, salt, cubed butter, and 4 cups of flour to the bowl. Knead at low speed until the dough comes together and is soft but not sticky. Add a few more tablespoons of the remaining flour if necessary. Continue to knead for 6–9 minutes until the dough pulls away from the sides of the bowl and is soft and smooth.
Step 3: Transfer the dough to a lightly greased bowl and make sure that it is completely coated. Cover with plastic wrap and let rise in a warm and draft-free place for about 45 minutes, or until doubled in size.
Step 4: Lightly flour your work surface and turn out the dough onto it. Divide it into two equally sized portions. Use your fingers to gently pat each half into a 8×12 inch rectangle while pressing it all over to remove any air pockets. Starting at the short end, roll up the rectangle into a tight roll and pinch the seams to seal. Tuck the ends of the roll slightly under the roll to create some tension on the surface and place each loaf into a greased 8×4 inch loaf pan tucked ends and seam side down. Cover with a greased piece of plastic wrap and let rise for about 45 minutes in a warm and draft-free place until doubled in size.
Step 5: Preheat oven to 390 degrees F and adjust oven rack to lower-middle position.
Step 6: Bake loaves for 25–30 minutes until golden brown (and the loaf registers 208 to 210 degrees).
Step 7: Invert bread onto a cooling rack. Reinvert loaves and brush the tops and sides with melted butter. Let cool completely before slicing.
Variations
This classic white bread recipe serves as a perfect canvas for delicious variations. For a heartier whole wheat version, substitute half of the all-purpose flour with whole wheat flour. This creates a nuttier flavor profile while maintaining a relatively light texture. You may need to add an extra tablespoon or two of water, as whole wheat flour absorbs more moisture.
For herb-infused bread that pairs beautifully with soups and Italian dishes, add 2-3 tablespoons of fresh chopped herbs like rosemary, thyme, or basil to the dough during mixing. A teaspoon of garlic powder creates an aromatic garlic bread base that’s perfect for making garlic toast.
Those seeking a sweeter breakfast bread can add 2 teaspoons of cinnamon and 1/3 cup of raisins or dried cranberries to the dough, creating a delightful cinnamon-raisin bread that’s perfect toasted with butter. These simple modifications allow you to adapt this homemade bread recipe to complement any meal.
Storage and Serving
Properly storing your homemade white bread preserves its freshness and prevents it from drying out. Once completely cooled, store loaves in a bread box or airtight plastic bag at room temperature for up to 3 days. For longer storage, slice the entire loaf and freeze it in a freezer-safe bag for up to 3 months, allowing you to thaw only what you need.
This versatile bread shines in numerous serving applications. For breakfast, lightly toast and serve with butter and jam, or use for the ultimate French toast. At lunch, it creates exceptional sandwiches – try it with deli meats and cheeses or use for a classic BLT. For dinner, slice it thickly for garlic bread, or cube it for homemade croutons or bread pudding. The slightly sweet undertones in this basic bread recipe also make it perfect for simple bread and butter as a side with hearty soups and stews.
FAQs
Can I make this white bread recipe without a stand mixer?
Absolutely! While a stand mixer makes the process easier, you can mix the ingredients with a wooden spoon until combined, then knead by hand on a floured surface for about 10-12 minutes until smooth and elastic.
Why didn’t my bread rise properly?
Several factors affect rising: check that your yeast is fresh and not expired, ensure your water is lukewarm (not hot), and make sure your rising environment is sufficiently warm. Cold kitchens significantly slow yeast activity.
Can I use bread flour instead of all-purpose flour?
Yes! Bread flour will give you an even chewier texture with a higher rise due to its increased protein content. The recipe works beautifully with either flour.
How do I know when my bread is fully baked?
The most reliable method is using an instant-read thermometer – the internal temperature should reach 208-210°F. Alternatively, the loaf should be golden brown and sound hollow when tapped on the bottom.
Can I make this recipe ahead of time?
You can prepare the dough through the first rise, then refrigerate it overnight. Let it come to room temperature for about 30 minutes before shaping and proceeding with the second rise, which may take longer due to the cold dough.
White Bread Recipe
- Prep Time: 15 mins
- Cook Time: 30 mins
- Total Time: 45 mins
- Yield: 4 people 1x
- Category: Lunch
- Method: Cooking
- Cuisine: American
Description
Looking for the perfect White Bread Recipe? Discover the best tips for making homemade white bread that is fluffy and delicious! Try it today.
Ingredients
- 1 ⅔ cups lukewarm water (divided)
- 2 ¼ teaspoon instant yeast (or active dry yeast)
- 1 teaspoon sugar
- 1 tablespoon honey ((or more sugar))
- 1 teaspoon salt
- 1 ½ tablespoons unsalted butter (cubed at room temperature)
- 4 ½ cups all-purpose flour (divided)
- 1 ½ tablespoons butter (melted for brushing)
Instructions
- Step 1: In the bowl of a stand mixer fitted with the dough hook combine the instant yeast, sugar, and half of the lukewarm water. Let sit for 5-10 minutes until foamy (if using active dry yeast, let sit for 15 minutes).
- Step 2: Add the remaining water, honey, salt, cubed butter, and 4 cups of flour to the bowl. Knead at low speed until the dough comes together and is soft but not sticky. Add a few more tablespoons of the remaining flour if necessary. Continue to knead for 6–9 minutes until the dough pulls away from the sides of the bowl and is soft and smooth.
- Step 3: Transfer the dough to a lightly greased bowl and make sure that it is completely coated. Cover with plastic wrap and let rise in a warm and draft-free place for about 45 minutes, or until doubled in size.
- Step 4: Lightly flour your work surface and turn out the dough onto it. Divide it into two equally sized portions. Use your fingers to gently pat each half into a 8×12 inch rectangle while pressing it all over to remove any air pockets. Starting at the short end, roll up the rectangle into a tight roll and pinch the seams to seal. Tuck the ends of the roll slightly under the roll to create some tension on the surface and place each loaf into a greased 8×4 inch loaf pan tucked ends and seam side down. Cover with a greased piece of plastic wrap and let rise for about 45 minutes in a warm and draft-free place until doubled in size.
- Step 5: Preheat oven to 390 degrees F and adjust oven rack to lower-middle position.
- Step 6: Bake loaves for 25–30 minutes until golden brown (and the loaf registers 208 to 210 degrees).
- Step 7: Invert bread onto a cooling rack. Reinvert loaves and brush the tops and sides with melted butter. Let cool completely before slicing.
Notes
Try This Recipe and Leave a comment Below, your opinion matters to me!
Nutrition
- Serving Size: 4 serving
- Calories: 400
- Sugar: 5g
- Sodium: 400mg
- Fat: 10g
- Saturated Fat: 3g
- Unsaturated Fat: 7g
- Trans Fat: 0g
- Carbohydrates: 40g
- Fiber: 5g
- Protein: 15g
- Cholesterol: 50mg


